Thursday 21 July 2011

The Origami flower


     Are you bored of Hard ware science? then lets try this soft paper science

I'm going to show you how to make origami ball, made from blossoms.

Step 1Materials


You need:
  • post-it notes
  • double sided tape or glue
  • scissors (for the tape)
  • and some time 

Step 2Folding


Take one post-it note and fold it in half to make a triangle (picture 1). Fold the dash line to make a diamond (picture 2). Return the left part in the previous position (picture 3). Fold the right part in half (picture 4). Make the same with the left part (picture 5). Then fold the whole model in half (picture 6). Fold in half again like in picture 7, but this time put the smaller triangle under the bigger (see picture 8 for the result). Fold in the dash line and again put the smaller triangle inside (picture 9). The model is ready.

Now make another 4 leaves in the same way.

Step 3Connect the leaves


Now let's connect the leaves from the previous step to make a blossom.

Cut a piece from the double-sided tape and place it like is shown in the picture below. Then stick another model. The second picture is more detailed....Connect the other pieces the same way.

Press the corners a little for more realistic effect (pictures 3 & 4).

Make another 11 blossoms like this one.

Step 4Connect the blossoms


Take 3 blossoms and stick them together. See the pictures below. Continue to add blossoms until they become 6. Now you should have haft of the ball ready. The same way make the other half.

Step 5Ready


The flower origami ball is ready!

Friday 15 July 2011

How to make a Super charge electric Air plane


Hi guys do u wish to send a paper plane more than 100 feet, then just follow this
The single-sheet paper airplanes you made when you were a kid (or perhaps last week in your cubicle) were, well, kid stuff compared to this beefed-up paper craft, which uses an electric motor from an old pager or toy powered by a big electrolytic capacitor. Known as a "Gold Cap" and made by Panasonic, the capacitor charges from a battery pack and then metes out a steady flow of power to keep your propeller whirring for about 10 seconds-just long enough to send the flyer airborne and carry it between 30 and 100 feet. (You can also add a gearing system to squeeze out even more flight time.) We've created plans for an eAT-6 "Texan" airplane and put them here and here to get you started. Just think twice before blindly launching this one soaring over the wall of your cube.


Build a Motorized Paper Airplane
Cost: $14.29
Time: 3
Hours
Easy | | | | |
Hard

Things Needed :
  • Paper eAT-6 plan (free; here and here)
  • Two 9x12-in. sheets smooth Bienfang Bristol Board (19 cents ea.; dickblick.com)
  • T-6 Texan Vacu Canopy ($2.96; squadron.com; #SQ9523)
  • Panasonic 2.5-volt 3.3F Gold Cap ($5.22; digikey.com; #P6966-ND)
  • Small electric motor (free; salvaged)
  • Plastic propeller (57 cents; towerhobbies.com; #LXHHV9)
  • AA four-battery holder (90 cents; digikey.com; #BH24AAW-ND)
  • Two header pins (27 cents; jameco.com; #103185-3)
  • Four AA batteries ($3.99)
  • Or you can find these above stuff  at your near by electrical hard ware store

STEP1 : PRINT THE PARTS

Download the eAT-6 plan PDF here and here and print each sheet on a separate piece of Bristol Board, or any thick paper that works in your printer.

STEP 2 : ASSEMBLE THE BODY

Carefully bend and glue the fuselage and wings into shape. Add the cowling and elevator, and glue the wings in place. Decorate it with decals or markers.

STEP 3 : MOTORIZE IT

Solder the Gold Cap to the motor, and solder two three-inch wires to the Gold Cap terminals on one end and header pins on the other. Slide the power system into the plane, and route the header pins out of the tail. (The capacitor should sit near the rear of the cockpit.) Glue the engine-nose disk to the front of the cowling, and add the cowling trim ring. Affix the plastic propeller to the electric motor's shaft.

STEP 4 : FUEL UP

Carefully bend each wing so it's angled up slightly. Install the AA batteries into a battery holder, and connect it to the header pins sticking out of the plane to juice the capacitor. Charge the plane until the motor is spinning at its maximum rpm, and disconnect it.

STEP 5 : FLY AWAY

Hold the plane and point it into the wind. Launch using a flinging motion with your arm, not your wrist. The plane will fly in a left-hand circle, the diameter of which depends on the amount of deflection that you bend into the rudder [see plans: 1, 2]. Bend the elevator slightly upward to make it climb.

Awesome MOD for Walk Along Glider

This topic is related to an Earlier post " How to make a Walkalong Glider ".

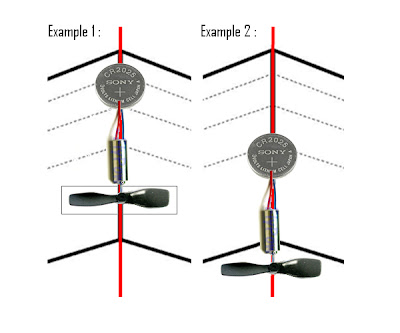
Hi guys i think u have seen my earlier post " How to make a Walkalong Glider ", today iam presenting you with an awesome mod to power ur glider

you need a extra of the following things (  It is Not tough if you can find these things) :


1. Old picooz rc helicopter's broken tail part 
                          or
     A small Pager motor or vibrator which u may  get for free of cost  in some    
     mobile repair shops

2. 3volts lithium "button battery''

3. Small propeller

                         or
     just follow this  "   http://www.instructables.com/id/mini-airplane/  "
     to make a cheap best propeller from old can


STEP 1:
 Just draw a red line on the glider as shown in the figure (just click on the image to zoom)

STEP 2:
Now make the power booster to the glider by connecting the battery, motor and propellor as shown in the figure , you can also modify little by adding a switch
STEP 3:
Now  just simply attach the power booster to the glider along the red line depending upon the balance point or CG(centre of gravity) of the glider after several test trials as shown in the figure

 Now just rock  the glider with ultimate fun but be careful  the glider may go far away from u leaving fun.

Sunday 3 July 2011

Candle powered hot air balloon


Build a candle powered hot air balloon using painter's plastic, balsa wood, and birthday candles.

Step 1


Cut the plastic and heat-seal the edges. 

Layout your materials on a large sheet cardboard. 

Pull out approximately 6 feet of the painter's plastic and cut it forming a sheet 9 x 6 ft. It's important to have plastic that is 1/2 mil (12 microns) or thinner. Thicker plastic is too heavy to fly. 

Fold the sheet in half along the 9 ft side forming a two-ply sheet 4.5 x 6 ft. Use a hot knife to seal the two 4.5 ft edges. An electric hot knife makes this really easy, but it can also be done with an old metal knife heated over a flame. 

Check your edges and correct any large holes. A few small holes won't cause problems.

Step 2


Melt candles together and attach them to balsa. Again, an electric hot knife makes this step a breeze. A heated fork can achieve the same results. Make sure to do both sides. 

Once the candles are attached together, melt them to the middle of a piece of balsa wood 3/16 x 1/8 x 36 inches.

Step 3


Assemble the balsa frame.

Make an "H" with the 36 in balsa and candle piece and two 3/16 x 1/8 x 30 in balsa sticks. Make the joints with a small piece of clear tape.

Step 4


Tape the balloon to the balsa frame.

Step 5


Use a stick inside the balloon to hold the plastic away from the candles and light them. Keep holding the plastic up until enough hot air has filled the balloon to inflate it.

Step 6


It's an amazing feeling when your creation first gets lift and starts to take off. 

At this stage, there's about ten thousand things that could go wrong. Carefully think everything through before you actually do it. 

I tied some thread to mine so I could fly it inside our warehouse without it getting away and setting the place on fire. 

It will drip a lot of hot wax, so keep it over the cardboard if possible. Also, if you let the candles burn all the way down, the balsa will catch on fire. I am currently experimenting with other types of candles to prevent this. 

Fly safe!

Saturday 2 July 2011

How to make a Walkalong Glider


How  would it be if a flying object comes along your walk, so lets try to make a colourful human powered glider by this simple steps

 Step1: Print the below plan on large paper and cut out the Pattern Outline of the Wings


First print out the half wing outline twice and cut each form. Turn one of the outlines upside down and tape the two pieces of paper together at the wing root. The resulting outline should have a wingspan of about 28cm (14 inches):


Step 2Cut out Piece of Foam-Mate Material

print out the half wing outline twice on a foam sheet and cut each of them


Step 3Draw Lines for Elevon and Airfoil Bends on Top and Bottom of Wing 


In this step the lines creating the elevons are drawn on the top of the wing cutout and lines creating the airfoil are drawn on the bottom of the wing:


Step 4Thermoform Dihedral and Washout Angle


Step 4 involves thermoforming a twist and upward bend  to each wing. The wing root will have a higher angle of attack than the with tip which prevents tip stalls when applying control inputs about the  roll axis (also called the  wing washout angle). The dihedral in an 
airframe design makes the aircraft more stable in the roll axis.


It is important to do this step before bending the airfoil.
 

Step 5Thermoform Airfoil shape to Wing


In step 5, an airfoil shape is thermoformed in the wing. Here's a video of making the first bend along the line closest to the leading edge of the wing:


Do the same for the remaining two lines:


Step 6Thermoforming Elevons


Thermoform the elevon surfaces to the trailing edge of the wing:


Step 7Fabricate a Nose Boom Ballast


A paper clip is straightened out to make a forward ballast to be attached to the nose. This weight will allow adjustment of the weight and balance 

Step 8Test Flights
The following step involves elevon and ballast adjustments to get the glider flying slowly, smoothly and in a straight line. Initially, the ballast should be as forward as possible.

Test fly the glider, launching it with a slight nose down attitude and at approximately walking speed:


adjust the elevons to get the glider flying straight. In the last video, the glider flies too much to the right, so the left elevon needs to be flattened:


The turning tendency has been corrected. Here is the second test flight:


In the last video, the elevons are trim too nose up and need to both be flattened:


How does it fly now? Let's see:


After more elevon trimming, the glider flies like this:


Step 9Flying Lessons 


                                                                  ***Enjoy***


How to make a rubber band powered ornithopter

An ornithopter is a rubber band powered plane that flaps its wings. Leonardo da Vinci drew pictures of ornithopters in his famous sketchbooks, and several early-20th-century attempts at powered flight were ornithopter variants. Some ornithopters were propelled with oars; others used the arms and legs of the occupants for power. Some ornithopters were to be used with the aid of an inflated balloon. 

A BRIEF HISTORY OF ORNITHOPTERS
The ancient Greek myth of Daedalus and Icarus tells the tale of how Daedalus made wings of wax and feathers so that he and his son Icarus could escape from captivity. But Icarus flew too close to the sun and his wings melted, while Daedelus flew too low and crashed into the rocks. Both died in their attempts to fly. Another early story tells of King Bladud, who ruled in Britain in the 9th century BC Bladud supposedly constructed a pair of wings with which he proposed to fly. But, according to the monk Geoffrey of Monmouth in a history of the British kings, Bladud was dashed to pieces as he landed on top of the Temple of Apollo in the town of Trinovantum. Earlier, in 1010, a monk in Malmsesbury, England, attached artificial wings to his body and jumped from the top of his abbey to glide to only two broken legs upon landing. Other tower jumpers suffered death or injuries, while a few achieved some partial success with their glides. Later, Leonardo da Vinci, realized that human powered ones wouldn't be able to fly and drew sketches of some ornithopters of his own. Around 400 years later, the French inventor Gustave TrouvĂ© designed an ornithopter that was powered by an internal combustion engine. 


You can further work out and make simple kind of your wish